How Do You Replace a Bathroom Faucet O’Ring When It Leaks at the Base or Spout?
If water is seeping out around the base of your spout or under the handle, a failed bathroom faucet o’ring is almost always the culprit — not a cracked body, not a bad cartridge, and definitely not a reason to buy a new faucet. An o’ring is just a small rubber (or sometimes silicone) doughnut that seals the moving joint between the spout and the faucet body. Over 3–7 years it dries out, flattens, or gets chewed up by mineral grit, and then it stops sealing. The good news: it’s the cheapest, most beginner-friendly plumbing repair you’ll ever do. This guide walks you through diagnosing it, matching the right size, and swapping it in under half an hour — plus when an o’ring is not your real problem.
At Aniflux Home we sell and service bathroom faucets every day, and “leaking at the base” is the single most common support question we get. Nine times out of ten, it’s the o’ring. Let’s get yours sealed.
How do I know it’s the o’ring and not the cartridge or the supply line?
It’s the o’ring if the water shows up around the base of the spout or handle only when the faucet is running or when you swivel the spout — and the countertop under the sink stays dry. That’s the tell. An o’ring seals a moving joint, so a bad one leaks at that joint under pressure, then stops when you turn the water off.
Here’s how to tell the three most common leaks apart, because the fix is completely different for each:
| Where you see water | When it leaks | Most likely cause | Fix |
|---|---|---|---|
| Ring around the spout base / handle base | Only while running or when you turn the spout | Worn spout or valve o’ring | Replace the o’ring ($2–$8) |
| Drip from the spout tip | Even with handle fully off | Bad cartridge or seat/spring | Replace cartridge ($15–$45) |
| Puddle inside the cabinet, under the sink | Constantly, or worse when running | Loose supply line or drain | Tighten/replace connection |
Run this quick test: dry everything with a towel, then run the faucet and gently swivel the spout side to side. If a fresh bead of water appears right where the spout meets the body, you’ve confirmed a spout o’ring. If the top of the counter stays dry but the cabinet floor gets wet, stop — that’s a supply-line issue, and our guide on how to fix a dripping faucet at home covers those under-sink connections in detail.
What actually makes a bathroom faucet o’ring fail?
O’rings fail because the rubber loses its elasticity and can no longer press outward against the faucet walls to form a seal. Three things speed that up: age, heat, and mineral scale. Understanding the cause matters because it tells you whether a $3 ring will last another 5 years or leak again in 6 months.
- Age and dry-out. Standard nitrile (Buna-N) rubber o’rings simply harden over time. Most last 3–7 years. Once they flatten from a round cross-section into an oval, the seal is gone for good.
- Hard water and mineral grit. Calcium and magnesium deposits act like sandpaper on the ring every time the spout turns. If you have hard water, this is usually the accelerator — and it’s worth reading how to clean hard water stains from a faucet, because the same scale attacking your finish is chewing up your o’rings.
- Wrong or no lubricant. O’rings need a thin coat of silicone-based plumber’s grease. If the original was installed dry, or someone used petroleum jelly (which degrades rubber), it fails early.
- Wrong material for the job. On the hot side or in a mixing valve, a cheap nitrile ring can cook. Silicone or EPDM rings handle heat far better.
This is why we always recommend replacing an o’ring with a proper material and greasing it — not just grabbing the nearest rubber ring from a junk drawer.
How do you replace a bathroom faucet o’ring, step by step?
You replace a bathroom faucet o’ring by shutting off the water, removing the handle and spout, sliding the old ring off, and rolling a matching new one into the same groove with a dab of silicone grease. Here’s the full sequence — it works for most single-handle and widespread bathroom faucets.
- Shut off the water. Turn the two valves under the sink clockwise until they stop. Open the faucet to release pressure and confirm the water is truly off.
- Plug the drain. Drop in the stopper or a rag so no tiny parts vanish down the pipe. This one step saves a lot of frustration.
- Remove the handle. Pop off the decorative cap, then loosen the set screw (usually a small hex/Allen screw) and lift the handle straight up. If your handle is what’s wobbling, our walkthrough on a loose lever handle uses the same disassembly.
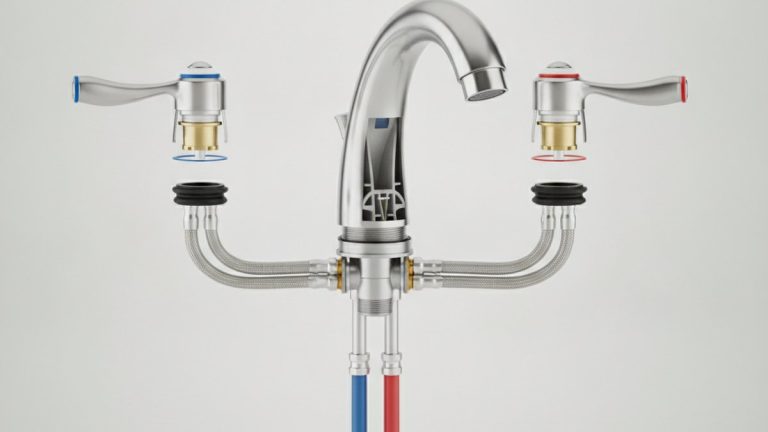
- Lift off the spout. For spout o’rings, pull the spout body straight up off the base with firm, even pressure. Twist gently while pulling if it’s scaled in place. You’ll now see one, two, or three o’rings seated in grooves on the brass stem.
- Note the arrangement, then remove the old rings. Snap a phone photo of exactly how many rings there are and where they sit. Use a plastic pick or your fingernail (never a metal screwdriver — it scratches the sealing surface) to roll each old ring off.
- Clean the groove. Wipe out mineral scale and old grease with a rag. A clean groove is half the seal. For stubborn scale, wrap a vinegar-soaked cloth around it for 10 minutes.
- Install the new o’ring. Coat the new ring in a thin film of silicone plumber’s grease, stretch it gently over the stem, and roll it into the groove so it sits flat and untwisted.
- Reassemble and test. Slide the spout back on, refit the handle and set screw, turn the water back on slowly, and run it while swiveling the spout. Dry, at last.
The whole process is nearly identical to a kitchen tap, so if you’d like a second illustrated reference, our tap o-ring replacement guide shows the base-leak version step by step with photos.
What tools do I actually need for this?
Almost nothing. You need an Allen/hex key set (for the handle set screw), a flat-head screwdriver or plastic pry tool, a rag, silicone plumber’s grease, and the replacement o’ring. Optional but helpful: needle-nose pliers, white vinegar for descaling, and a headlamp so you can see the groove. No soldering, no glue, no torch.
How do I find the exact right o’ring size for my faucet?
Match three measurements: the inside diameter (ID), the cross-section thickness (CS), and the material. A ring that’s close but not exact will either roll out of the groove or refuse to seal. The safest method is to bring the old ring with you — but here’s how to measure precisely.
- Inside diameter: lay the old ring flat and measure straight across the inner hole with calipers (a ruler works in a pinch).
- Cross-section: measure the thickness of the rubber itself. This is the number most people skip, and it’s the one that matters most for the seal.
- Material: nitrile (black, general use), EPDM (great for hot water), or silicone (heat-tolerant, long life). When in doubt for a bathroom mixer, silicone or EPDM is the safer upgrade.
Most faucet brands publish an o’ring size in their parts diagram, and many sell a faucet-specific repair kit that includes the exact rings, seats, and springs for your model. If you own an Aniflux Home faucet, the model number stamped under the spout or on your order confirmation maps directly to a repair kit on anifluxhome.com — no guessing at generic sizes. Buying the model-matched kit is the single best way to make sure the new ring lasts as long as the original.
Can I just use a universal o’ring assortment kit from the hardware store?
Yes, for a quick fix — those $6 assortment boxes will get you sealed today if you match ID and cross-section carefully. But two cautions: the assortment rings are usually generic nitrile, which won’t last as long on a hot-water side, and the sizing can be slightly off, which leads to a repeat leak. For a permanent repair, a model-specific ring or kit beats a “close enough” universal ring almost every time.
Should I replace just the o’ring or the whole faucet?
Replace just the o’ring if the faucet body is solid, the finish still looks good, and the only symptom is a base or handle leak — that’s a $3 fix versus a $150 replacement. Replace the whole faucet only if the body is cracked, the finish is corroding and pitting, the faucet is 15+ years old with multiple failing parts, or you simply want an upgrade.
Think of it as a decision tree:
| Situation | Best move | Rough cost |
|---|---|---|
| Base leak, faucet otherwise fine | Replace o’ring | $2–$8 |
| Base leak + spout drip + stiff handle | Full repair kit (o’rings + cartridge) | $20–$50 |
| Cracked body, corroded finish, or leaking from multiple points | Replace the faucet | $80–$250 |
| Faucet works but you want a new look/finish | Upgrade the faucet | $80–$300 |
If you land on “replace the faucet,” don’t buy blind — match the spout reach, hole spacing (centerset, single-hole, or widespread), and finish to your existing sink. Our guide on how to choose the right bathroom faucet walks through every one of those decisions so your new fixture actually fits the holes you already have.
How long will the new o’ring last, and how do I make it last longer?
A properly installed, well-greased o’ring in the right material lasts 5–10 years — often longer than the cheap one that came in the box. The two things that shorten its life are dry installation and mineral scale, and you control both.
- Always grease it. A thin film of silicone plumber’s grease lets the ring glide instead of dragging and tearing every time you turn the spout. Never petroleum jelly — it swells and rots rubber.
- Manage hard water. Wipe the base dry after use and descale periodically. Scale is the #1 enemy of both your finish and your seals.
- Don’t over-tighten. Cranking the handle or spout collar too hard deforms the ring. Snug, not gorilla-tight.
- Choose the right material. On heavily used or hot-side seals, upgrade to silicone or EPDM instead of standard nitrile.
Do those four things and this is genuinely a “fix it once and forget it” repair.
FAQ
Can I use Vaseline or petroleum jelly on a faucet o’ring?
No. Petroleum-based products like Vaseline chemically break down rubber and silicone o’rings, causing them to swell, soften, and fail within months. Always use silicone-based plumber’s grease, which is designed to be compatible with rubber and safe for potable water.
Why does my faucet leak at the base only when I turn it on?
Because the o’ring seals a moving joint that’s only under water pressure when the faucet runs. When off, there’s no pressure pushing water past the worn ring, so it stays dry — which is exactly the fingerprint of a bad o’ring versus a dripping spout (cartridge) or under-sink leak (supply line).
How much does it cost to replace a bathroom faucet o’ring?
The part itself is $2–$8 for a single o’ring or $15–$30 for a full manufacturer repair kit. If you do it yourself it’s essentially free labor and 15–30 minutes. A plumber might charge $75–$150 for the same visit, which is why this is one of the highest-value DIY plumbing repairs.
Are all bathroom faucet o’rings the same size?
No. O’rings vary by inside diameter, cross-section thickness, and material, and even faucets from the same brand use different sizes across models. Always match the old ring exactly or use a model-specific repair kit — a “close” size is the most common reason a repair leaks again.
My spout still leaks after replacing the o’ring — what did I do wrong?
Usually one of three things: the new ring is the wrong cross-section (too thin to seal), it got twisted or pinched during install, or the leak was never the o’ring but the cartridge. Re-open the faucet, check the ring sits flat and greased in a clean groove, and if the drip is at the spout tip rather than the base, replace the cartridge instead.
Do I need to turn off the whole house water to change an o’ring?
No. Just close the two shut-off valves under the sink (turn clockwise until snug), then open the faucet to relieve pressure. If your sink has no shut-off valves, that’s the only case where you’d close the main house valve — and it’s worth adding shut-offs while you’re at it.
A quick word on trust
About the author: This guide was written by the Aniflux Home fixtures team — the same people who handle warranty claims and repair-part questions for our bathroom and kitchen faucets every day. We’ve walked hundreds of customers through this exact repair over the phone and email.
Standards & warranty: Quality faucet o’rings and cartridges should meet drinking-water safety standards such as NSF/ANSI 61 and 372 (lead-free), and the valve assemblies in reputable faucets are cycle-tested to hundreds of thousands of on/off cycles before they ship. Aniflux Home faucets are backed by a limited lifetime warranty on the finish and function, and replacement o’ring and cartridge kits are stocked by model number so your repair matches the original spec — not a generic approximation.