
How Do You Put a Kitchen Faucet Aerator Back Together After Cleaning It?
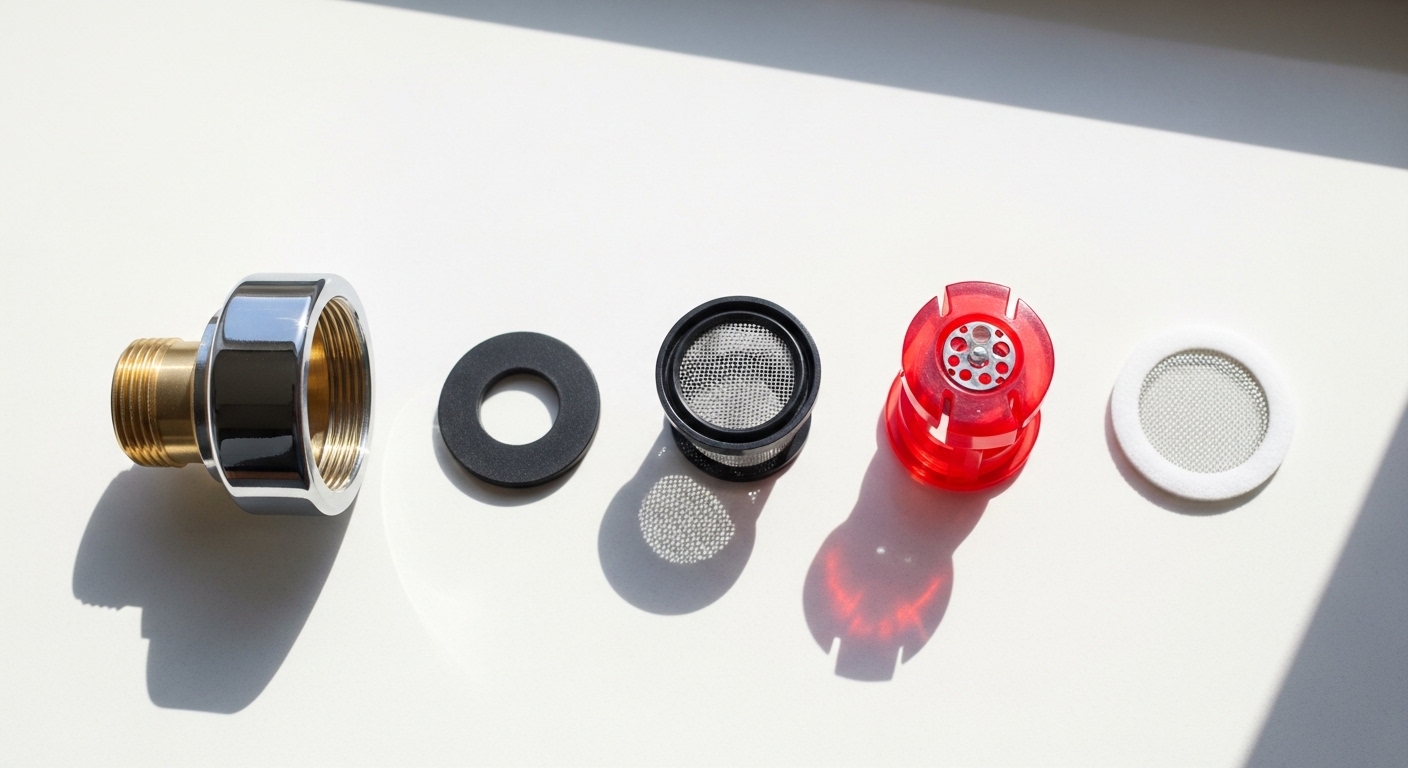
If you unscrewed your aerator to clean out the grit and now you have a tiny pile of discs and rings on the counter, don’t panic — knowing how to put a kitchen faucet aerator back together is genuinely a five-minute job once you understand what each part does and which way it faces. The whole assembly is just a stack of small parts that sits inside a threaded housing, and the order matters far more than most people realize. Get the sequence right and your stream comes out straight and soft; get one disc upside down and you get a fan of water spraying at your backsplash.
At Aniflux Home we field this exact question constantly, usually right after someone cleans hard-water scale out of the aerator and can’t remember how it went back. Below is the exact order, why it matters, and how to fix the most common “I put it back and now it sprays everywhere” mistakes.
What order do the parts go back in?
The parts stack from the water side down to the spout opening in this order: rubber washer (O-ring) at the very top, then the outer metal or plastic screen, then the flow restrictor/insert, then the fine mesh disc closest to where the water exits. The rubber washer always seats against the faucet threads to create the seal, and the fine mesh always faces the direction the water flows out.
Here’s the thing that trips people up: a standard aerator only has three to five pieces, but they’re symmetrical enough that you can force them in wrong. The safest habit is to lay the parts out in a line in the order you removed them, in the same orientation. If you’re already past that point, use this reference stack, working from the top (the end that screws onto the faucet) toward the bottom (the end water pours from):
- Rubber washer / O-ring — sits at the top against the spout threads; this is your seal against drips.
- Aerator housing (the outer shell) — everything nests inside this.
- Flow restrictor / white or colored plastic insert — the piece that limits gallons-per-minute and shapes the stream.
- Metal screen or dual screens — mixes air into the water; dome/convex side typically faces up toward the incoming water.
- Fine outer mesh disc — the flat screen you see when you look up into the spout; faces down/out.
If your aerator has two screens stacked together, keep them together and in the same orientation — they’re often a matched pair that creates the aeration effect.
Which way does the mesh screen face?
The fine mesh disc faces the water outlet — the direction the water pours out — and the domed or cupped screen faces up toward the incoming water. If a screen is domed on one side, the dome almost always points up into the flow so the water spreads across it and picks up air.
An easy sanity check: hold the housing the way it will sit on the faucet (open end up, since that end threads onto the spout). The flat fine mesh you’d see looking up into the spout should be the last thing in the stack, closest to the outlet opening. If you can look through the assembled aerator toward a light and see the fine mesh on the exit side, you’ve got it right.
Why is my faucet spraying sideways after I put the aerator back?
A faucet that sprays sideways or fans out after reassembly almost always means one disc is upside down, the parts are in the wrong order, or the rubber washer is pinched or missing. The aerator’s whole job is to blend air into a straight, laminar stream; when the layers are out of sequence, the water hits an edge and deflects.
Run through this quick diagnostic before you blame the faucet:
- Sprays in a wide fan: the flow restrictor or a screen is flipped. Take it apart and reverse the suspect piece.
- Sprays out the side / leaks where it threads on: the rubber washer is pinched, doubled up, or you cross-threaded the housing. Unscrew fully and restart by hand.
- Weak trickle after cleaning: a screen went back in with a fold, or debris is still lodged in the mesh. Re-rinse.
- Water drips from the aerator seam: housing isn’t snug, or the washer isn’t seated flat.
Nine times out of ten it’s one flipped part. Aerators are cheap and universal, so if you genuinely lost a piece down the drain, a replacement is a couple of dollars at any hardware store — just match the thread type (male vs. female) and size.
Male vs. female aerator — how do I tell which one I have?
A male aerator has its threads on the outside of the housing and screws up inside the spout; a female (also called an aerator with internal threads) has threads on the inside and screws onto the outside of the spout tip. This matters when you buy a replacement or a matching key.
Look at the tip of your spout with the aerator removed: if you see threads on the outside of the metal spout, you need a female aerator. If the threads are hidden inside the spout opening, you need a male aerator. Standard kitchen sizes are Regular (15/16″ male, 55/64″ female) and Junior/Tom Thumb for smaller spouts. When in doubt, bring the old one to the store — it’s the fastest match.
How tight should I make the aerator when I screw it back on?
Hand-tight plus about a quarter-turn with pliers is right — snug enough to stop drips, but not cranked down. Aerator housings are usually chrome-plated plastic or thin brass, and over-tightening either strips the threads or cracks the housing, which turns a five-minute cleaning into a replacement.
Always start the thread by hand to avoid cross-threading — this is the single most important step. If it doesn’t spin on easily, back it off and try again; it should never require force to start. Once it’s finger-tight and seated flat, wrap the housing with a rag or a strip of tape to protect the finish, then give it a gentle quarter-turn with slip-joint pliers or an aerator key. Then run the water and check for leaks at the seam.
A quick word on the rag: pliers will chew right through brushed nickel, matte black, or champagne bronze finishes in one squeeze. If you care about the look of your faucet — and if you invested in a nice finish, you do — protect it. We cover finish durability in depth in our guide on whether brushed nickel faucets are worth it, and the same care applies to any premium finish while you’re working near the spout.
What causes the aerator to clog in the first place?
Aerators clog from mineral scale (calcium and magnesium in hard water), sediment stirred up after plumbing work, and tiny bits of pipe or supply-line debris that collect on the fine mesh. The aerator is basically a strainer, so it catches everything before it reaches your dishes — which is exactly why it needs periodic cleaning.
If you’re on hard water, you’ll see white, crusty buildup that comes back every few months. That same scale is what dulls the rest of your faucet, and the fix is the same chemistry: a vinegar soak. Here’s the reliable cleaning routine before you reassemble:
- Soak all the parts in a small bowl of white vinegar for 20–30 minutes (up to an hour for heavy scale).
- Scrub the mesh gently with an old toothbrush; poke stubborn holes clear with a toothpick or pin.
- Rinse every piece under running water so you don’t reinstall vinegar residue or loosened grit.
- Lay the parts out in order, then reassemble using the stack above.
For the broader spot-and-scale problem on the visible faucet body, our walkthrough on how to clean hard water stains from a faucet uses the same vinegar approach and keeps the whole fixture looking new, not just the aerator.
How often should I clean or replace a kitchen aerator?
Clean the aerator every 3–6 months on hard water, or once a year on soft water; replace it every couple of years or whenever the plastic insert cracks or the mesh tears. They’re inexpensive, so replacement is often easier than fighting deeply embedded scale.
If your flow has dropped noticeably and cleaning doesn’t fully restore it, the flow restrictor insert may be scaled shut internally. At that point a new aerator restores the stream instantly. If you’re chasing low pressure across the whole faucet — not just the aerator — that’s a different diagnosis; our piece on the “wide open faucet” and full flow explains how flow restrictors and aerators shape what actually comes out of your spout.
Aerator part order and orientation — quick reference
Use this table as your cheat sheet while the parts are on the counter. It lists each component from the spout-thread side down to the water outlet, plus which way it faces and what goes wrong if you flip it.
| Order (top → outlet) | Part | Which way it faces | If installed wrong |
|---|---|---|---|
| 1 | Rubber washer / O-ring | Flat against spout threads | Leaks at the threads; drips down the spout |
| 2 | Aerator housing (shell) | Open threaded end up | Won’t seat; cross-threads |
| 3 | Flow restrictor / plastic insert | Wide/keyed side per its shape | Wide spray or a hard, un-aerated jet |
| 4 | Metal screen(s) | Dome/convex side up toward flow | Sideways spray; splashing |
| 5 | Fine mesh disc | Faces down/out toward outlet | Weak or fanned stream |
What tools do I need, and what if I can’t unscrew it at all?
Most aerators come off and go back on by hand; if it’s stuck, you need slip-joint pliers or an aerator key, a rag to protect the finish, and white vinegar to break the scale bond. You almost never need anything more specialized than that.
If a scaled-on aerator won’t budge for reassembly checks or removal:
- Wrap the housing in a vinegar-soaked cloth for 15–20 minutes to dissolve the mineral “glue.”
- Turn it counterclockwise (as you look up at it) to loosen — righty-tighty still applies, just inverted because you’re looking up.
- Protect the finish with tape or a rag before applying pliers.
- If the housing is cracked or the threads are stripped, replace the whole aerator — it’s a two-dollar part, not a repair.
While you’ve got tools out and you’re already comfortable working at the spout, this is a good moment to address any other nagging issues — a loose kitchen faucet lever handle is another quick tighten that often gets ignored until it’s really wobbly.
A note from the Aniflux Home team
This guide was written and reviewed by the Aniflux Home fixtures team, who spend their days testing kitchen and bathroom faucets, sprayers, and aerators for real-world flow performance and finish durability. We reassemble and bench-test aerators against standard kitchen flow ratings (the U.S. federal maximum for kitchen faucets is 2.2 gallons per minute, with many efficient models rated at 1.5–1.8 GPM), so the orientation advice here comes from hands-on teardown, not guesswork. Aerators sold in the U.S. commonly conform to ASME A112.18.1/CSA B125.1 fixture-fitting standards, and reputable faucet brands back their spouts and aerator assemblies with limited lifetime warranties — so if a part fails prematurely, check your warranty before buying a replacement. Always turn off nothing extra for this job (the aerator is downstream of the valve), but do close the drain or lay a towel so you don’t lose small parts.
FAQ
Can I run the faucet without the aerator while I figure out the order?
Yes. Running the faucet with the aerator off is a smart troubleshooting step — the water will come out as a fast, un-aerated stream, which flushes any loose debris out of the spout before you reinstall. Just expect splashing, and keep your small parts well away from the drain.
Why does my aerator leak from the threads after reassembly?
A thread leak almost always means the rubber washer is missing, pinched, doubled up, or the housing is cross-threaded. Unscrew it completely, confirm there’s exactly one washer seated flat at the top, restart the threads by hand, and snug it only a quarter-turn past hand-tight. If it still weeps, the washer may be flattened with age — a new aerator or washer solves it.
Does the flow restrictor have to go back in?
You can technically leave the flow restrictor out to boost flow, but we don’t recommend it — the restrictor is what keeps your faucet within its rated GPM and helps create the soft, splash-free aerated stream. Removing it increases water use and often makes splashing worse. If your pressure feels low, clean the restrictor rather than discarding it.
My aerator has two screens stuck together — do I separate them?
No, keep them as a pair unless they’re clogged between the layers. Many kitchen aerators use two closely stacked screens to mix air into the water, and they’re designed to sit together in a specific orientation. If you must separate them to clean, note which way the domed sides face and put them back exactly the same.
What if I lost a part down the drain?
Replacement aerators are universal and cost only a couple of dollars. Take the surviving parts (or the whole spout tip measurement) to a hardware store and match the size and thread gender — Regular is the most common kitchen size. Buying a complete new aerator is usually easier than sourcing a single washer or screen.
How do I know if it’s back together correctly?
Turn the water on to a medium flow. A correctly assembled aerator delivers a single, straight, slightly cloudy (air-filled) stream that lands where you point it, with no side spray and no dripping at the seam. If it fans, sprays sideways, or trickles, take it apart and check the orientation of the screens and restrictor against the table above.
One Comment